.gif)
Description
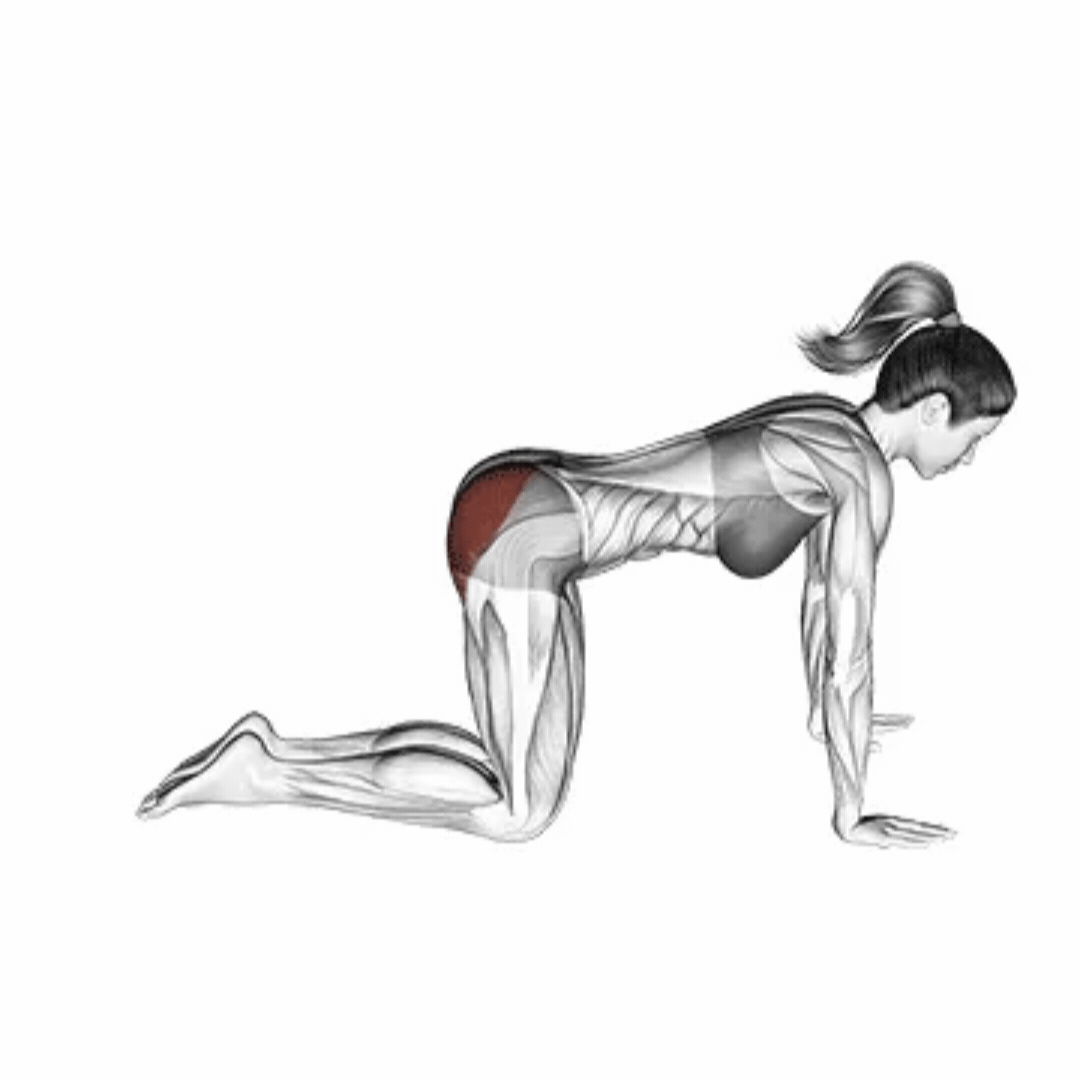
The Resistance Band Glute Bridge is an effective variation performed by placing a resistance band around the knees, simultaneously targeting the gluteus maximus and gluteus medius. The resistance applied to the outside of the knees forces hip abduction, activating the side glute muscles. This provides a more comprehensive glute activation compared to the classic glute bridge. Since it requires minimal equipment, it is practical for home workouts and travel. It maximizes glute activation while placing minimal stress on the lower back and improves posture. The constant tension created by the band engages the gluteus medius, preventing the knees from caving in and improving functional movement quality. It can be used as a warm-up or as a standalone glute exercise.
Step-by-Step Instructions
- 1
Place the resistance band just above your knees.
- 2
Lie flat on your back on the floor, bend your knees to 90 degrees, and plant your feet flat on the ground.
- 3
Your feet should be hip-width apart and positioned close to your glutes.
- 4
Apply resistance to the band by pushing your knees outward, and maintain this position throughout the movement.
- 5
Brace your core and press your lower back into the floor.
- 6
Drive through your heels to lift your hips upward, squeezing your glutes.
- 7
At the top position, your shoulders, hips, and knees should form a straight line; keep pushing your knees outward.
- 8
Hold the squeeze for 1-2 seconds, then lower your hips back down in a controlled manner.
- 9
Do not allow your knees to cave in at any point during the movement.
Key Points
- ✓The band should be placed just above the knees, not too high or below the joint.
- ✓Knees must be actively pushed outward throughout the entire movement.
- ✓Lift your hips by driving through your heels, not your toes.
- ✓Fully squeeze the glutes at the top without hyperextending your lower back.
- ✓Keep your back flat against the floor to minimize the arch in your lower back before lifting.
Common Mistakes
- ✗Allowing the knees to cave in - this disengages the gluteus medius.
- ✗Over-arching the lower back - shifts the work from the glutes to the lower back muscles.
- ✗Pushing through the toes instead of the heels - reduces glute activation.
- ✗Incorrect band placement - fails to transfer resistance to the target muscles.
- ✗Using a limited range of motion - prevents full contraction of the glutes.
Breathing
Exhale as you lift your hips and squeeze your glutes, and inhale as you lower them back down with control.
Muscle Activation
Safety
Precautions
- Individuals with acute lower back pain should exercise caution.
- Those with pelvic sensitivity should perform the exercise on a soft surface.
- Pregnant women in their later trimesters should avoid lying flat on their backs.
- Individuals with knee pain should adjust the position of the band.
Safety Tips
- Ensure the band is in good condition and provides the appropriate level of resistance.
- Perform the movement slowly and with control.
- Continuously pushing the knees outward keeps the gluteus medius activated.
- Use a soft exercise mat for comfort.
- Choose the correct resistance level so the band is not overly tight, allowing proper form.
Frequently Asked Questions
Which muscles does Resistance Band Glute Bridge work?
Resistance Band Glute Bridge primarily works these muscles: Gluteus maximus, Gluteus medius. It also engages: Hamstring, Core kasları, Adductor, Alt sırt.
Is Resistance Band Glute Bridge suitable for beginners?
Resistance Band Glute Bridge is a Beginner level exercise. Learning difficulty: Easy.
Can Resistance Band Glute Bridge be done at home?
Yes, Resistance Band Glute Bridge can easily be done at home.
What are common mistakes when doing Resistance Band Glute Bridge?
One of the most common mistakes: Allowing the knees to cave in - this disengages the gluteus medius.
How many sets and reps for Resistance Band Glute Bridge?
Recommended: 3-4 sets and 12-20 reps.
Exercise Information
Equipment
Primary Muscles
Secondary Muscles
Benefits
- ✓Simultaneously activates the gluteus maximus and gluteus medius.
- ✓An ideal warm-up exercise for glute activation.
- ✓Helps prevent knee valgus (knees caving in).
- ✓Improves posture and helps alleviate lower back pain.
- ✓Places minimal stress on the lower back.
- ✓Highly practical and can be done anywhere with minimal equipment.
- ✓Improves the shape and strength of the side glutes.